
Hiya to whoever is reading this,
AS you may know, i got my ears pierced last month and i have waaaaay too many earrings already ( but its ok because i love all of them!)! (i wouldn’t mind but i only have 2 ears!)

I noticed a problem though with the way i was storing them (which was in a little bowl) (thx lexi for the bowl, i’m now using it for something else though!), the earrings would get scratched and i couldn’t actually see all them properly to choose! So i put my thinking cap on and thought of a way i could display them, and decorate my bedroom at the same time; Jewellery Bunting!

It should work for pretty much most types of jewellery and since my bedroom looks really bare now that mum made me take down my xmas decorations, i thought it would be a win-win situation.! If you actually try this, then please comment/link a pic! It would be amazing to see them even if you don’t use it for jewellery!
EQUIPMENT
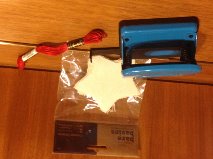
(soz that it’s upside down!)
– canvas/strong fabric shapes ( i got mine from paper chase, but you could always cut your own!)
– thread/wool/embroidery silk in any colour
– a strong hole puncher
– scissors
– Sellotape
– hairspray/clear nail varnish/glue/i guess hair gel/wax would work too!
1) Punch holes near the edge of all of the shapes (i eventually ended up using scissors because i nearly broke the hole puncher!)
2) (btw i’m actually making them as i type this so the keyboard is now covered in bits of fabric!!!) Cut the string to the size required and remember to tie a knot at both ends! If the knot isn’t big enough, then wrap the area around the knot in sellotape so that pesky fabric has no chance of escape! MUHAHAHAHAHAHAHHAAHA! ahem… back to normal…anyway…..
3) Then thread the thread through the holes you made in the fabric and secure a knot at the other end (and use sellotape if needed)
4) Then take your jewellery and either pin it through (if it’s earrings or badges) or cut two little holes, thread the chain through and do-up the clasp if it is a necklace/bracelet/not a pin thing!
5) If your fabric starts to fray/drop little pesky annoying fibres everywhere, then spray it with hairspray/paint the area with clear nail varnish/paint area with glue/use hair gel or hair wax to secure the fibres.
6) Then hang your masterpiece wherever you want, i decided to hang mine over the mirror on my dressing table so i can see it when i’m getting ready . Also, please feel free to either comment/link/email me (georgiegrlblog@outlook.com) a picture if you make it as it would be amazing to see that people want to try the DIY’s i do (so maybe i’ll do more!?) and if i get some then i’ll put them in a post with the links to your blog, you never know, it may boost your blog!
THESE PICS ARE TERRIBLE AS ITS NIGHT AND THE LIGHTING HATES ME!


If you want to see more of these then feel free to like, comment and subscribe! If you are waiting for me to do the One Lovely Blog nomination post them i’m really sorry for not doing it sooner, and it will be written and uploaded hopefully tomorrow! Thanks for nominating me if you have though!!!!
Luv
GeorgieGrl
xxx
P.S. i will be continuing my Achieving Resolutions series tomorrow so if you want me to give you tips on how to achieve your resolutions then comment below and i’ll see what i can do…
P.P.S. The 1st picture of the silver earrings are the ones i got from one of my friends, I’ll call him Kobra (Kobra, if you don’t like that name then text me) I really like the earrings and thanks so much for the xmas gift which i got today!!!

That’s so cute! I might try that
LikeLiked by 1 person
Please do!! It super easy!!
LikeLiked by 1 person
Wooh! You are so creative Georgie! Loved your blog!!
LikeLiked by 1 person
Thx!
LikeLiked by 1 person
Haha I’ll sleep now. It’s literally 4 am and I’ve got school tomorrow! Bye!!
LikeLiked by 2 people
Oh no! Soz for keeping you awake!!!
I’ve start skl on Wednesday, I feel so lucky (for once!!!)
LikeLiked by 1 person
I’m now awake! Oooh exam today! 😦
LikeLiked by 1 person
Good luck!!!
LikeLiked by 1 person
i’m always losing my cute little earrings !! i’ll try and do this. but please post a final picture of what it looks like, i’m still a little hazy on how it should be.
LikeLiked by 1 person
Yeah, sure!
Sorry if it’s a bit unclear if you tell me which bits, I’ll try to change them!
LikeLiked by 1 person
The procedure is pretty clear and seems easy. i just want to see what it would look like lol
LikeLiked by 1 person
Oh yeah, soz!
I’ll add a pic in a sec but I’m just brushing my teeth and I got a bit of toothpaste on my phone!!!
LikeLiked by 1 person
ahahahahahahahaha !
thanks for sharing that
i needed a laugh
LikeLiked by 1 person
Haha, I’m glad I make ppl laugh! I can be so stupidly clumsy!!
LikeLiked by 1 person
i’m clumsy too, but i can’t say i’ve ever got toothpaste on my phone. hahaha. You’re so adorable !
LikeLiked by 1 person
Thx! 😊
LikeLiked by 1 person
Just added pics now…
LikeLiked by 1 person
Love itttt !!
LikeLiked by 1 person
Looks good! Also, I was being a stalker and reading the comments. I can honestly say that I’ve never gotten toothpaste on my phone… accidentally. XD I did put it on my phone on purpose once because it was supposed to fix hairline cracks. Ahh, so gullible.
LikeLiked by 1 person
Haha lol!
I’ve done much worse accidentally, and there is no way I’m revealing THAT online!
LikeLike
Ahh your earring collection is fabulous! I love this diy idea 🙂
LikeLiked by 1 person
Thx!
LikeLiked by 1 person
My advent calendar was basically full of earrings!
LikeLiked by 1 person
I wanted to make one of these but since I’m not so good at DIY stuff, I just bought a box with tiny compartments from one of the home stores here
LikeLiked by 1 person
I’m probably the worst at DIY but this one is actually pretty straight forward!
LikeLiked by 1 person
It’s not that bad. Those jewelry buntings are pretty to look at
LikeLiked by 1 person
They didn’t go as bad as I thought they would and they help me keep organised and not lose them!
LikeLike
Georgie you are really talented! Stick to this hobby, you never know!!
LikeLiked by 1 person
Haha thx!
The amount of times I’ve accidentally stuck my project either to my hand or the kitchen table with super glue is probably more than I’ve sneezed in my whole life!
LikeLiked by 1 person
Hahaa!! that’s part of the fun 😂
LikeLiked by 1 person
Lol!
LikeLiked by 1 person
You’re so talented! Love the DIY!
LikeLiked by 1 person
Thx!
LikeLike
THIS IS SO CUTE.
LikeLiked by 1 person
IKR! It’s so useful too!
LikeLiked by 1 person
Wow you’re so AMAZING and talented, like howww 😀
LikeLiked by 1 person
Thx! I’m absolutely awful at most other things so that’s not so true!
LikeLiked by 1 person
Okay, I have essentially zero artistic skills and not a single creative bone in my body. I suck at everything DIY. Sad but totally true. I really enjoyed reading this post though! The output turned out to be really adorable. ❤
LikeLiked by 1 person
Thx! I can guarantee I’m worse than you!!
LikeLike
You’d easily lose that bet. 😂
LikeLiked by 1 person
haha, not likely!
LikeLike
Really good idea!
LikeLiked by 1 person
Thx!
LikeLike
Really nice idea! I’ll be doing a collab on DIY jewellery and I’ve got a pic of my DIY earring holder, so when I post it I’ll let you know!
LikeLiked by 1 person
Aww thank you! Yay! Plz do 😄
LikeLiked by 1 person
I would have sent the pic but I can’t via message so… The post’s for next Sunday!
LikeLiked by 1 person
Ok 😄
LikeLiked by 1 person
What a good idea!
LikeLiked by 1 person
Thanks 😊
LikeLike